Sunday, November 28, 2010

Summer Garden Update


Chloe sitting in the new garden with the lettuce & carrots behind her.  It's great to see her take an active interest in the veggie plot, she loves to water, weed & of course harvest the goods.


This is the new plot, its coming along slowly but pretty much everything has at least sprouted, now we just have to wait for things to get bigger & see if they produce well.


Some lettuce & heirloom carrots, all coming along nicely & before I know it we will be picking the lettuce, this will be the first thing we harvest from the garden this summer


Beans with the potato crop in the rear, going nuts!  I'm a good Polish/Lithuanian girl so love my spuds, hope there are millions under the dirt


Asparagus slowly appearing, a couple of years before I get to taste this bed


Four different tomato varieties, spring onions & leeks in the rear

I have the rain, now I need some sun so all of these babies can grow, grow, grow...

Wednesday, November 24, 2010

Busy Days

Busy days with a new job have meant that my blogging has sadly fallen behind.  I had to give up on the end of the cookbook challenge though I'm still happy that I did every week right up until the last couple when I was running around like a mad woman & had to say no for my kids & my sanity!

While I try and get myself back into a groove, here are some pictures of dishes made with the broad bean crop which is now all over ( I do have several bags in the freezer for later use though)!


Broad Bean, pea & pancetta salad with blanched almonds

Beetroot, broad bean & chard salad (all from the garden!!)

For now I am busy keeping up the new summer garden which will hopefully be producing soon, planning meals that I can make ahead, spending lazy summer days with the kids on my days off & the Christmas onslaught has begun too, so its dinners, parties, kids concerts, end of year break ups etc.  Love this time of year, enjoy XXX

Tuesday, October 26, 2010

First pick of the crop


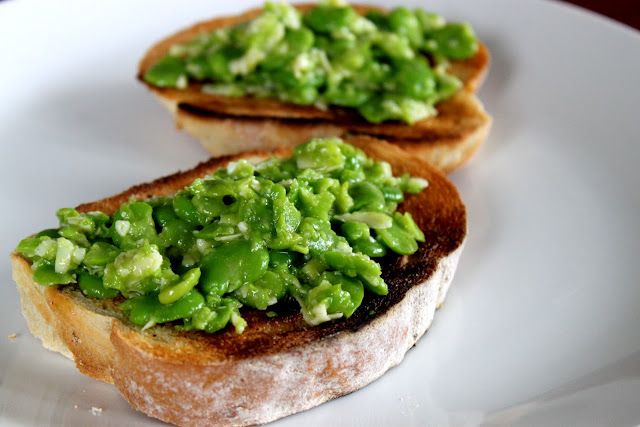
My broad bean crop is now producing tons of big fat, bright green beans that I adore.  For my first pick I bashed them up with some Parmesan, olive oil and lemon juice and piled them on some toasted sourdough rubbed with garlic - Heaven!

Icy Fun

Firstly, apologies for the delay in posting, I haven't been able to get a photo on blogger for the last few days, I kept getting a 'server error' message.  Looked in the forums & turns out all sorts of people having problems, cleared my cookies & seems ok now.

So now that I am back up and running here is my Cookbook Challenge, icy theme, mango & pineapple frozen fruit blocks.  I loved them yet despite omitting the 'green' stuff I still couldnt convince the kids they were as good as the kind you get in a packet, oh well next time I will just stick to something chocolate flavoured, I did try & they do eat a lot of fresh fruit so I cant hold it against them!

Note - I omitted the mint 'green stuff' as it can have a tendency to turn off the kids no matter what it is or tastes like!

Also, sadly I will not be posting for picnic week as falafels & homus were on the menu & were a complete disaster, they completely fell apart & were inedible, didnt think you  would want to read about plain old dip which was wonderful  so as I'm bowing out for this week, sorry things are a bit mental here & dont have the time to come up with a new dish!

Frozen fruit blocks - Iced - 180 very cool concoctions

1 ripe mango
125g (3/4 cup) chopped fresh pineapple
1 tablespoon chopped mint
185ml sweetened pineapple juice
6 ice block sticks

Put the mango, pineapple, mint & juice in a blender and blend until smooth.

Pour into 6 80ml icy pole moulds, push the sticks in and freeze for 5-6 hours.

Dip quickly in hot water to remove the moulds

Makes 6

Tuesday, October 19, 2010

Delicious Stuffed Roti Bread


For bread week of The Cookbook Challenge I thought I would test myself and make a style of bread I had never attempted before.  I love Roti so when I saw this recipe for stuffed Roti I just knew I had to give it a go!  The bread is incredibly simple to make, no yeast, no kneading, only 20 minutes to rest.  The filling took more time than the bread can you believe, only because I was boiling really big potatoes & they took forever to cook.  Anyway once the filling was mixed & the dough rested, it was a simple task of rolling (I did in all in my hand in more of a stretching method), stuffing, sealing, flattening (again my hand) & frying for a couple of minutes each side in the pan.  I was a little worried they would fall apart as there were some holes left after stuffing them but once cooking they kept their shape really well.  One thing to note was that I had about half the stuffing left so it would be a great idea to double the dough quantity to make 8 as they really are worth it!

I served these with a simple kidney bean salad dressed with red onion, cumin, coriander & lime juice which was perfect alongside, some nice zing to go with the earthy flavours of the bread.  Yum!

Aloo gobi parathas: Roti breads stuffed with cauliflower and potato - Ben O'Donoghue - Ben's Barbecue

Roti Dough

250g plain flour
pinch salt
50ml sunflower oil

Filling

300g potatoes
200g cauliflower
2 tablespoons chopped coriander leaves
2 teaspoons garlic paste
2 teaspoons ginger paste
75g onion, finely chopped
1/2 green chilli, chopped
1 teaspoon turmeriv
1 tespoon chilli powder
juice of 1 lime
salt
sunflower oil, for frying

To make the dough, combine the flour and salt.  Mix in the oil and add enough water to form a soft but not sticky dough.  Wrap in cling wrap and rest for 20 minutes.

Boil the potatoes in their skins in salted water until tender.  Meanwhile, in another pan, cook the cauliflower in salted water until soft.

Once the potatoes are cooked, peel and mash them.  Drain the cauliflower, then crush it and mix with the potatoes.  Add the remaining ingredients, apart from the salt and oil for frying.  When combined season with salt to taste.

To make the parathas, take a portion of the roti dough (makes 4 so take a quarter at a time) and flatten it in your hand.  Add a spoonful of the filling then roll the dough into a ball.  Using a rolling pin (or your hands), flatten the ball to around 1cm thick.

Prepare your barbecue or pan on a medium heat.  Lightly oil & cook the parathas on both sides until golden and cooked through.

Thursday, October 07, 2010

Italian Week & guess who finally got a new camera


I finally made up my mind and bit the bullet & bought a new camera, went for a Canon 500D.  So far I am still on full auto and haven't had much of a chance to play yet the photos are amazing, especially compared to my old camera.  The soup photo here is old & the pasta & risotto are from the new camera, I am one very happy girl & cant wait to test it out in Cairns on our holiday next week!

When I saw that this week's theme for the Cookbook Challenge was Italian I was very happy, I mean what good Aussie didnt grow up eating spag bol & pizza?  Seriously there is a bit more to it than that and I cook a lot of Italian style food at home, it's almost pure Aussie tucker to us by now.  So I picked out 3 recipes from a book I rarely use even though everything looks and sounds delicious whenever I flick through it, Jamie Oliver's Jamie's Italy.  The first was this hearty Ribollita, I cook a big pot of soup a week so am always trying out new ones.  Loved this, a good combination of beans, spices and veggies and the torn up bread gave it a lovely silky, thick texture as promised.  Also made up for the Grand Final weekend of excess and junk, think hot dogs & Macca's for breakfast in bed on Sunday morning - all 4 of us!

Notes - I used tinned beans as I am always too lazy to wait that hour for the dried ones to cook  and instead of cavolo nero I picked some fresh rainbow chard from my garden to throw in the pot.  I also added about 3 cups of chicken stock in place of the beans cooking water for flavour & to loosen it up.

My Favourite Ribollita - Jamie Oliver - Jamie's Italy

310g zolfini or cannellini beans, fresh, or dried and soaked overnight
1 bay leaf
1 tomato, squashed
1 small potato, peeled
2 small red onions, peeled
2 carrots, peeled
3 sticks celery, trimmed
3 cloves garlic, peeled
olive oil
a pinch of ground fennel seeds
a pinch of dried red chilli
1 x 400g tin plum tomatoes
310g cavolo nero, leaves and stalks finely sliced
2 large handfuls of good quality stale bread, torn into chunks
sea salt and freshly ground black pepper
extra virgin olive oil to serve

Add your beans to a pan of water with the bay leaf, tomato and potato.  Cook until tender, dried will take up to an hour, fresh about 25 minutes.  Drain and reserve about half a glass of the cooking water, discard the bay leaf, tomato and potato.

Finely chop your onions, carrots, celery and garlic.  heat a saucepan with a splash of olive oil and add the vegetables to the pan with the fennel and chilli.  Sweat very slowly on a low heat for about 15 to 20 minutes until soft. but not brown.  Add the tomatoes and bring to a gentle simmer for a few minutes.  Add the beans & a little of the reserved water and bring back to the boil.  Add the cavolo nero, stir it in and then stir in the bread too.  Add more cooking water if necessary.  Continue to cook for about 30 minutes, you want to achieve a silky, thick soup. 

Season with salt and pepper & stir in some extra virgin olive oil and serve.

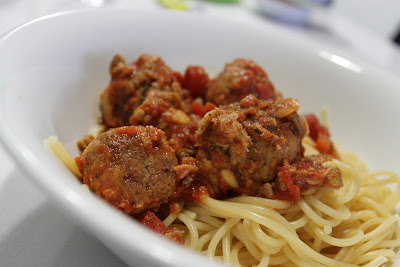
Second up was spaghetti & meatballs with a difference.  Chloe loves her spag & meatballs which can get a bit boring so finding a nice variation is always good.  This is a Sicilian inspired dish of fresh tuna meatballs.  Really nice & the tuna was tender unlike some 'meat' balls which can be a bit tough if not cooked right.

Notes - I didnt bother to liquidize my sauce, I like it rustic.

The best tuna meatballs - Jamie Oliver - Jamie's Italy


For the tomato sauce:

olive oil
1 small onion, peeled and finely chopped
4 cloves of garlic, peeled and finely sliced
1 teaspoon dried oregano
2 x 400g tins plum tomatoes
sea salt and freshly ground black pepper
red wine vinegar
a small bunch of fresh flat leaf parsley, leaves picked and roughly chopped

For the meatballs:

400g tuna
olive oil
55g pinenuts
1 level teaspoon ground cinnamon
sea salt and freshly ground black pepper
a handful of fresh flat leaf parsley, chopped
100g stale breadcrumbs
55g freshly grated parmesan
2 eggs
zest and juice of 1 lemon

First make the sauce.  Place a large pan on the heat, add a good glug of olive oil, your onion and garlic and fry slowly for 10 minutes or so until soft.  Add the oregano, tomatoes, salt and pepper and bring to the boil.  Simmer for about 15 minutes, then liquidize until smooth.  Add red wine vinegar to taste and adjust seasoning as necessary.

While the tomatoes are simmering, chop the tuna up into 2.5cm dice.  Pour a good couple of tablespoons of olive oil into a large frying pan and place on the heat.  Add the tuna to the pan with the nuts & cinnamon.  Season lightly with salt and pepper and fry for a minute or so to cook the tuna on all sides and toast the pinenuts.  Remove from the heat and put the mixture into a bowl.  Allow to cool down for 5 minutes, then add the oregano, parsley, breadcrumbs, Parmesan, eggs, lemon zest and juice.  Mix up with your hands & form into balls a touch smaller than a golf ball.  Place on an oiled tray in the fridge for 1 hour to rest.

Put the pan you fried the tuna in back on the heat with a little olive oil.  Add the meatballs and jiggle them around until they're golden brown all over.  Add to the tomato sauce, serve with spaghetti sprinkled with parsley.

Lastly I made a cauliflower risotto with a lovely crunchy anchovy pangrattato to top it off.  Nice and unusual though the actual risotto flavour was a bit bland so not sure I would make it again, I wont post the recipe for this one

Off to play with the camera now, bye...

Tuesday, September 28, 2010

Grand Final Take 1

For grand Final Day Take 1 I made some  footy inspired cupcakes to suit this weeks Cookbook Challenge theme of Cup.  What a day, I went over to my mums with the kids as Michael is lucky enough to be an MCC member & he even got a reserved seat in the ballot, no such luck for the rest of us.  Everyone apart from my Dad was barracking for the Pies so in the spirit of things & feeling a bit sorry for the Saints as they havent won a GF in a VERY long time, I made my cupcakes in both teams colours.  The base recipe I used was Nigella's Night & Day Cupcakes, a beautiful light & fluffy chocolate cupcake with a cream cheese icing which gave me a nice white background to paint the team colours on.  I was pretty pleased with the decorating myself, I haven't dabbled much so am by no means an expert.  Everyone else loved them too.  Now to do it all again this weekend, I think the party is at my place plus I have to take Chloe to the Justine Clarke concert in the morning so will be keeping things on the simple side.  GO PIES and finally put us all out of our misery & let us get on with Spring/Summer.....

Note - I have given the base recipe here, if you want to decorate, I used the icing tubes for sale in supermarkets, much easier than the mess of mixing your own, not to mention having to pipe from a bag!

Night-And-Day Cupcakes - Nigella Lawson - How to be a domestic Goddess

Cupcakes:
2 tablespoons cocoa powder
2 tablespoons boiling water
75g golden caster sugar
50g dark muscovado sugar
125g self raising flour
2 large eggs
125g very soft unsalted butter
1 teaspoon vanilla extract
1 tablespoon milk

Icing:
200g icing sugar, sieved
100g cream cheese
juice of 1/2 a lime or 1 tablespoon lemon juice
12 chocolate coated coffee beans or dark chocolate (if not decorating in my manner!)

Preheat oven to 200c.  Line a 12 whole muffin tin with paper cases.  Mix the cocoa to a paste with the boiling water and set aside while you make the cupcake mixture.

Put the sugars, flour, eggs, butter & vanilla in a food processor and blitz to combine smoothly. Scrape the mixture down the sides, and then pulse while you add the cocoa paste and mil down the funnel.  You should have a batter with a soft dropping consistency, if not, add a little more milk.  Dollop into the cases in the tin and bake for about 20 minutes, until an inserted cake tester comes out clean.

Leave in the tn for 5 minutes then remove to a wire rack to cool completely.  When cool, make the icing by beating together the icing sugar & cream cheese until soft.  Add lime or lemon juice to taste & spread over cupcakes.  Decorate with a coffee bean in the middle of each or shavings of chocolate as desired.

Wednesday, September 22, 2010

Spring/Summer garden on the way


I am super excited that the new garden bed has finally been built.  Last weekend Michael and I put in a massive effort, he built, I shoveled, the kids were taken care of & 2 days later, it's all ready to settle in and accept an offering of seeds from me that will hopefully turn into an abundant crop.  Can you see my broad bean bushes & herbs poking through from the side garden bed?

I have so many seeds waiting to plant that I dont think I will fit them in.  So far garden bed number 1 on the left will have corn, potatoes, beans, cucumber, carrots(and/or beets) & Watermelon.  Still have to plan bed no 2 and I have a little space in my existing beds for a couple of things too.  Fingers crossed most of it grows as this is still all pretty new to me though I do hope to get much better over the years.

I will keep you updated on the progress and cooking of crops....

Tuesday, September 21, 2010

Dreaming of Summer

In my impatience for summer to arrive I decided to make a granita with tropical fruits for this weeks Cookbook Challenge.  I know it was madness & I should stick to gooey warming puddings for a couple of weeks yet but I just couldn't resist.  The theme was raw so I guess no matter what I chose it was not going to be a hearty or Wintery dish at all.  I actually had a hard time choosing something to make, I initially wanted to make a salad of some description but nothing took my fancy so fruit salad it was.  Technically the granita has a sugar syrup which is cooked so it's not all raw, though as it ends up frozen with fresh fruit I figured it was pretty close.  The recipe is for passionfruit granita with a suggestion to change to mango if you prefer, yes please, I looooveee mangoes & they so remind me of summer which I am absolutely dying for so mango it was.  The granita is fantastic, sweet & very fresh tasting & perfect with a selection of fruits.  I scooped it over paw paw, kiwifruit & pineapple.  I dont normally eat paw paw & this one left a really unpleasant taste in all our mouths so I dont know if I bought a dud or it's an acquired taste, wont be going there again & will stick to the others which were perfect.  Have some leftover which I think I might have with some sweet red strawberries, esp as the forecast over the next week even shows the temp reaching figures beginning with a 2, yippee!  Oh, did I mention I am also off to Cairns in a couple of weeks for an early taste of summer, VERY EXCITED!!!!  Any recommendations for places to eat (child friendly) or places to go?

Notes - Granita can be stored in the freezer tightly covered for up to a week once made & feel free to mix up the fruit with any combo you like and what is in season/available of course

Exotic fruit salad with passionfruit (or mango) granita - Relaxed cooking with Curtis Stone

Serves 4

1/4 cup sugar
500g ripe passionfruit, halved (or sub with 2 ripe mangoes, pureed)
1 tablespoon fresh lemon juice
1/2 pineapple, peeled, cored & cut into bite-sized pieces
1 pawpaw, peeled, seeded & cut into bite sized pieces
1 mango, peeled, pitted and cut into bite sized pieces
1 star fruit, cut into 6mm thick slices
4 kiwis, cut into bite sized pieces
1 tablespoon chopped fresh mint leaves (optional)

In a small, heavy saucepan, stir 1 cup of water and the sugar together until the sugar dissolves.  Slowly bring the syrup to the boil, then remove it from the heat and let it cool completely.

Spoon the passionfruit pulp or mango puree into the cooled syrup and mix together.  Stir in the lemon juice.  Pour the mixture into a 20cm square baking dish and freeze it for about 30 minutes, or until the mixture is icy around the edges. 

Using a large fork, stir the icy part of the mixture into the remaining mixture in the dish.  Continue to freeze the mixture, stirring in edges every 20 to 30 minutes, for about 1 1/2 hours or longer, or until it is frozen.  Using a lrge fork, scrape the frozen granita into flaky crystals.  Cover & keep frozen.

In a large bowl, gently toss the fruits and mint together.  Spoon into serving bowls, top with granita and serve.

Tuesday, September 14, 2010

Some simple Chinese - Kylie Kwong Style

That's right, we are up to week 44 of the Cookbook Challenge & it's Chinese theme.  Kylie Kwong's Simple Chinese Cooking had to be the book to use, I love the look of it though rarely cook from it, I think this is actually my second look in for the year thanks to the challenge, I will have to keep reminding myself that it's full of great & simple (as the title states) recipes.  I chose a Hoisin pork stir fry with a Chinese style coleslaw to go alongside.  The picture looks a bit bland however it really was a lovely dish.  Hoisin sauce of course gives the pork a sweet flavour & the quick cooking kept it nice & tender.  I used my wok burner which I normally dont use & I'm sorry, it didn't seem to get the temperature as hot as the regular big burner & my pork seemed to stew rather than stir fry nicely.  It didn't seem to affect the overall flavour though as you can see it ended up a very unappealing greyish color.  Back to the big ring next time I think.  The coleslaw was lovely & fresh though for the life of me I couldn't get Chloe to eat any of it, carrot, cabbage, cucumber, all on her list of no's despite the fact that she is a pretty good eater, oh well a night without veggies occasionally shouldn't cause too much harm.  All in all a nice midweek dinner though not for every day, even though it's all pretty simple, there is a lot of chopping & pickling & making sauces, etc so it actually took a while to prepare.

Stir-Fried Pork Fillets with Hoisin Sauce - Kylie Kwong - Simple Chinese Cooking

600g pork fillets, cut into 5mm slices
1 small cucumber
2 tablespoons vegetable oil
1 tablespoon light soy sauce

Marinade

3 garlic cloves, finely diced
1/4 cup hoisin suace
2 tablespoons malt vinegar
2 tablespoons shao hsing wine or dry sherry
1 tablespoon light soy sauce
2 teaspoons white sugar
1 teaspoon five spice powder
1/2 teaspoon sesame oil
1/2 teaspoon sea salt

Combine pork with marinade ingredients in a large bowl, cover, and leave to marinate in the fridge for 30 minutes.

Using a vegetable peeler, finely slice cucumber lenghtways into ribbons, set aside.

Heat oil in a hot wok until surface seems to shimmer slightly.  Add half the pork and stir fry for 30 seconds.  Remove from wok with a slotted spoon and set aside.  Add remaining pork with all the marinade and stir fry for 30 seconds. Return reserved pork to the wok with soy sauce and stor fry for a further minute or until pork is just cooked through and lightly browned.

Serve with reserved cucumber

Celery, Carrot and Cabbage Salad - Kylie Kwong - Simple Chinese Cooking

1 small cucumber
3 small carrots, peeled
1 teaspoon white sugar
1 teaspoon sea salt
2 sticks celery, sliced on the diaganol
1/2 cup malt vinegar
2 tablespoons white sugar, extra
2 1/2 cups finely shredded savoy cabbage
2/3 cup sping onion, julienne
1 1/4 cups fresh bean sprouts
1/2 cup mint leaves
2 tablespoons light soy sauce
2 tablespoons lemon juice
pinch Sichuan pepper & Salt (basically Sivhuan peppercorns & Sea Salt, dry roasted & then pounded to a fine powder)

Using a vegetable peeler, finely slice cucumber and carrots lenghtways into ribbons.  Set cucumber side and cut carrots into a fine julienne.

Combine carrots in a bowl with sugar and salt, mix well and leave to stand for 15 minutes.

Add celery to a small saucepan of boiling salted water and blanch for 30 seconds.  Drain, refresh under cold water and drain again.  Set aside.

Combine vinegar and extra sugar in a small heavy based saucepan and stir over heat until sugar dissolves.  Simmer, uncovered for about 1 minute or until slightly reduced/  Set aside to cool before stirring through pickled carrot.

In a bowl combine reserved cucumber, pickled carrot mixture, celery, cabbage, spring onion, bean sprouts and mint.  Pour over combined soy & lemon juice & mix well.  Arrange in a bowl, sprinkle with Sichuan pepper & salt & serve immediately.

Thursday, September 09, 2010

Midweek Moussaka

During the week I have to cook a meal after work for either my parents or Michaels parents when they have finished their babysitting shift & I have finished work.  As Joshie is a very clingy, sookie la-la, mumma's boy, when I finish work at 5pm ( I work from home so am right there when finished), the boy will not stand for anything other than being held so I have to prepare something the night before that can be cooked/reheated very simply.  This works fine for now when warming comfort food is all the go but when the temperature is soaring, an hour in the oven will not do pleasant things to the house, not to mention you dont feel like such heavy food when the heat is on.  So let's hope Joshie decides to have fun with the grandparents before that time arrives or we might be having pizza for dinner, even the pub is out as he goes to bed at abt 6pm no matter how hard we try to keep him up later, I know I shouldn't complain about this!

Anyway this weeks offering was George Calombaris' Moussaka recipe from the Hellenic Republic book, it's also on the menu there & is his mums recipe which can be found here.  I loved it, it has a layer of grilled eggplant on the bottom, a tasty, sweet meaty tomato sauce in the middle, next a layer of grilled sliced potatoes & a keflagraviera cheese bechamel on top which also includes eggs.  The eggs help the sauce to set & the whole thing holds together really well when you serve it, a bonus as I hate it when you have such a tasty dish that falls to slop on the plate when you serve it.  I served it with a Greek salad & it was a winner, everyone gave it the thumbs up!

Tuesday, September 07, 2010

Happy Fathers Day


Fathers Day this year was a lovely long lunch at my mums, we started with a beetroot soup, then had a warming beef pot roast & to finish with I made dessert.  I had some egg whites in the freezer that were begging to be whipped into a meringue.  I remembered this Jamie Oliver recipe that sounded perfect for this time of year.  Normally I think of a pav/meringue as a summer cake, laden with tropical fruit & cream.  This version however was smothered in roasted nuts, pears & a chocolate ginger sauce as well as the usual whipped cream.  By the time you pile everything on it ends up being a pretty massive affair & to prove how much it was enjoyed, after 5 adults & the 2 kids dug in there was only a teeny piece left.  We all felt sick of course but couldnt stop going back for more it was so good.  So hope all the Dad's out there had a good day, for me that means, family, good food, nice wine & a nap on the couch after lunch as you are so full you cannot budge an inch!  This is my crunchy entry for the cookbook challenge though after the topping went on the meringue wasnt really all that crunchy, oh well, I had good intentions.

Notes: I couldnt for the life of me get the skins of the nuts before they were roasted so I roasted them & peeled them afterwards which was much easier, any tips?  Also, used pears in juice rather than syrup, sauce tasted good this way but maybe it would have been thicker & sticker if syrup used instead?

Tray Baked Meringue with Pears, Cream, Toasted Hazelnuts and Chocolate Sauce - Jamie Oliver - Jamie at Home

4 large egg whites
200g unrefined golden caster sugar
a pinch of sea salt
100g hazelnuts, skins removed
2 x 400g tins of halved pears in syrup
optional: 2 pieces of stem ginger, thinly sliced
200g dark chocolate (minimum 70% cocoa solids)
400ml double cream
50g icing sugar, sifted
1 vanilla pod, halved & seeds scraped out
zest of 1 orange

Preheat oven to 180c.  Line a 40  x 25cm baking tray with baking paper.

Put your egg whites into a squeaky clean bowl, whisk on medium until the whites form firm peaks then with the mixer running, gradually add the sugar and a pinch of salt.  Turn the mixer up to high & whisk for about 7 to 8 minutes until white and glossy.  Spoon the meringue on to the tray & shape it into an A4 size rectangle.  Place in the oven & bake for 1 hour or until crisp on the outside & a little sticky inside.  At the same time, bake the hazelnuts on a separate tray in the oven for an hour or until golden.  Take our of oven when ready and allow to cool.

Drain the tin of pears, reserving the syrup from 1 can.  Cut each pear half into 3 slices.  Pour the pear syrup into a saucepan with the ginger and warm gently over medium heat until it starts to simmer.  Take off the heat and snap the chocolate in to the pan, stirring until it's all melted.

To assemble, place your meringue on a board or tray.  Whip the cream with the icing sugar & vanilla until it forms smooth, soft peaks.  Smash or chop the toasted hazelnuts and sprinkle half of them over the meringue.  Spoon half of the cream over the top & drizzle with some of the sauce.  Divide most of the pears over the top evenly.  Pile over the rest of the cream & pears.  Drizzle with more chocolate sauce, then sprinkle over the remaining nuts & some grated orange zest.  Serve straight away.

Tuesday, August 31, 2010

Golden Cardamom Chicken with Crispy Onion Spiced Rice


The theme for this weeks Cookbook Challenge was Bird.  Now bird is a very broad theme, lots of different birds out there, chicken, duck, quail and pheasant just to name a few & cookbooks have hundreds of recipes for them.  Despite this I had a hard time deciding what to make.  I think when the theme is so broad and there is too much choice I have trouble making up my mind.  I nearly went for duck confit, a dish I am dying to make but due to the amount of duck I have consumed lately (out & home cooked) and the amount of fat involved I thought I would stick to some simple chicken.   I guess I consider chicken to be a very boring meat, in fact when I got married I didnt have any chicken on the menu for the same reason & the staff organizing totally agreed with me.  Dont get me wrong I eat a lot of chicken and enjoy it though it usually features in very simple dishes in this house.

In the end I found this very interesting sounding dish from Nigella Lawson's Feast cookbook.  It falls under the wedding chapter & serves lots as part of a banquet, I halved the ingredients & it fed us for 2 nights.  I normally tend to shy away from frying in so much oil but it was the weekend & it was for the good of the challenge so away I went.  I marinated the chicken for 2 days & it was extremely tender, the cardamom lent a lovely & very subtle flavour among all the other spices in the marinade.  The coating was nice & crispy & again had some beautiful flavour.  It also tasted great the next day straight from the fridge so it would be ideal picnic food to drag along as well.  The rice was tasty too & love the crispy onion, have always been a sucker for near burnt fried onion slices.  The icing on the cake would have been the sweet and crunchy pomegranate seeds but alas not in season.

Golden Cardamom Chicken with Crispy Onion Spiced Rice - Nigella Lawson - Feast

For the Chicken and the Marinade

zest and juice of 1 lemon
1 onion
1/2 teaspoon ground allspice
1/2 teaspoon ground black pepper
1/4 teaspoon cardamom seeds (from abt 5 pods)
2 fat garlic cloves
125ml olive oil
1/2 tablespoon Maldon Salt or 1 teaspoon table salt
1.5kg boned and skinned chicken thighs

For the coating

4 eggs
175g cornflour
1/2 teaspoon ground allspice
1/2 teaspoon paprika
1/2 teaspoon fine salt
vegetable oil for frying

For the Rice

1 onion
3 tablespoons oliv eoil
500g basmati rice
3 cardamom pods, crushed
1/2 teaspoon ground allspice
1/2 teaspoon ground cinnamon
1 litre hot chicken stock
75g pine nuts, toasted
1-2 tablespoons chopped parsley
1-2 tablespoons chopped mint
1-2 tablespoons chopped coriander

To finish
1-2 tablespoons pomegranate seeds (if available)

To marinate the chicken, put the lemon juice, peeled & roughly chopped onion, allspice, pepper, cardamom seeds, peeled garlic, oil and salt into a processor and blitz to a pulp.  Chop the chicken pieces in half, add the marinade to coat & leave in the fridge overnight or for up to 2 days. 

let the chicken come to room temperature while you start the rice.  Peel the onion and slice into very thin half moons.  Heat the oil in a wide saucepan (one which has a lid) and cook the sliced onions in the oil over a fairly high heat until darkly golden and very crispy.  Remove to a plate and reserve for later.

Turn the heat down, add the rice and spices to the pan and turn in the oil until the rice is slicked and glossy.  Add the stock and let the pan come to the boil, then put the lid on & turn the heat down to the lowest setting.  Cook without peeking for 15 minutes by which time all the water should have been absorbed.  Take off the heat and leave to rest for 5 minutes.

While the rice is cooking you can get on with your chicken.  Beat the eggs together and in a separate bowl, combine the cornflour, allspice, paprika and salt.

Pour enough oil into a pan until it comes about 1cm up the sides & heat until sizzling.  Shake excess marinade off chicken, coat in flour mix, then eggs & place in the frypan.  Cook until golden and crispy (about 10 ,minutes - I did mine one side at a time for 5 mins each), cut into a piece to make sure it's cooked through - thicker pieces may need longer, then remove to a plate lined with paper towel.  Continue until all of the chicken is done.

When ready to serve, stir the pine nuts and most of the onion & herbs through the rice.  Tip onto a serving platter, top with the chicken & finish off  with the rest of the onion & herbs & pomegranate seeds if you have any.

Sunday, August 29, 2010

A Very Brief Taste of Melbourne

Stokehouse Wagyu beef cigars, artichoke tapenade and horseradish

Friday night I was fortunate enough to attend A Taste of Melbourne for the first time with some friends thanks to SBS Food and Green & Blacks Organic Chocolate.  Unfortunately for me due to a sick little boy who needed a visit to the Dr I didn't arrive until 8.30pm & couldn't make it again due to a very busy weekend.  The doors close at 9.30pm & the bar closes at 9.15pm so 1 hour was really not that long to spend there.  Luckily I had printed out the menu and knew some of the dishes I wanted to try.  Thanks to the map I even managed to find these places though I only got to try 2 savoury dishes & one sweet & only managed to visit the Green & Blacks produce stall.  I have to say I was very disappointed as there was so much I wanted to try, maybe next year I will have better luck.

My first stop was The Stokehouse for the fabulous beef cigars, artichoke tapenade and horseradish.  Wow, I am so glad I tried these as they were luscious, crunchy pastry, moist & delicious filling & the tapenade was the perfect partner.

Next I dropped into Green and Vlacks to say i & thanks for the tickets & tried the chocolate and raspberry cheesecake brownies & butterscotch choc chip cookies, both were great & are from the upcoming new cookbook, I will be very interested to see the book when released, I already have one of their books & love it being a true chocoholic.

Longrain was next on my list so I headed upstairs only to be very disappointed to find EVERYTHING sold out, even the cocktails, not very happy!!!!!!   So it was off to Charcoal Lane for the  Seared Kingfish, Red Curry, Puffed Rice & Coconut.  I loved the flavours in this dish though I think the temperature put me off a bit.  It was quite cold & I think I would have preferred it warmer even though the guy dishing it up assured me this was the temperature it should be served at. 

By this stage I only had 6 crowns left out of my 60 (yes I managed to spend a lot in a short time without even getting much as there may have been some glasses of wine going down too).  I stopped by the Melbourne Wine Room & Mr Wolf stall and they were kind enough to let me sample the Vanilla pannacotta and blood orange jelly.  Nice though by this stage I was more interested in drinking more wine than sweets so headed out the door for a long night at the Brunswick Green and Retreat!

Apologies too for the lack of photos, I did take heaps more but they were completely crap, I really need that new camera  which current financial circumstances have had to put on hold again for now....

Green and Blacks samples

Looking forward to next year & hope I manage a bit more time next visit.

Wednesday, August 25, 2010

Celebration Cupcakes


When I think of any celebration I immediately think of cake.  Seriously, what cant be celebrated over a good piece of cake in any form?  When it comes to kids, cake is usually best appreciated in the form of cupcakes, and cupcakes with sprinkles or any type of bright decoration.  So for week 41 of The Cookbook Challenge I made up a batch of sticky toffee cupcakes for the celebration theme.  I didnt really have anything specific to celebrate so I tried to find a recipe that was a bit healthier & these had lots of fruit in them, sultanas, apricots & dates.  Chloe was my decorator & she chose a mix of blue, orange & green sprinkles this time.  Sadly while they looked cheery & bright the cakes in themselves were not that spectacular.  They were okay but didnt have much rise & the flavour was a bit on the ordinary side.  I also didnt like the choc topping so no I wont be making these again.

Sticky Toffee Cupcakes with Chocolate Topping - Jamie Oliver - Happy Days with the Naked Chef

30g sultanas
30g dried apricots
30g dates
1 teaspoon baking powder
140g self raising flour
30g muscovado sugar
1 tablespoon golden syrup
1 large egg
30g melted butter
140ml hot water

Icing
40g butter
40g caster sugar
40g plain chocolate
70ml double cream

Preheat the oven to 200c.  In a food processor, blitz the sultanas, apricots, dates, baking powder and a little of the flour (just enough to stop the fruit sticking to the blades).  Put this mixture into a bowl with the sugar, golden syrup, egg & butter & stir together.  Then add the very hot water and the remaining flour and mix well with a whisk.  Divide the mixture between 12 cupcake papers (note Jamie places the papers on a tray, I put them in a muffin tray).  Bake for about 15 minutes.

Meanwhile, melt all the icing ingredients together in a small saucepan and bubble for a while until darkened in color slightly.  Remove from the heat and let the sauce cool until it thickens.  Then ice each cupcake.

Tuesday, August 24, 2010

Taste of Melbourne - Last minute give away

I have a few last minute double double passes to give away to this weekends Taste of Melbourne Festival thanks to the lovely people at Green & Blacks Chocolate.  All passes also come with some free blocks of milk & dark chocolate to sample.  

As this is very last minute, the first people to contact me with their address and contact details will get the tickets, so email away & I will mail out tomorrow and hopefully the packages will arrive in time.  Please note all but 1 of the double passes are for Thursday or Friday sessions only so please indicate when you would like to go.

I'm very excited to be going to this years festival, I haven't been before & have heard both good & bad comments on previous years shows.  There is good food & wine and I'm going with fine friends so sure that no matter what I will enjoy myself, details will follow.

Tuesday, August 17, 2010

Apple & Rhubarb pie

I have been waiting for apple week in the Cookbook challenge for ages, I have been craving am apple pie like you wouldn't believe, cant actually remember the last time I ate one let alone made one.  I chose Bill Granger's Apple & Rhubarb pie recipe from Bill's Sydney Food as he is usually pretty good with his sweet recipes.    The pie recipe serves 6-8 and is supposed to be baked in a 23cm pie tin.  As I only had 2 smaller dishes I made 2 pies & froze one.  This was a brilliant move as the 1 smaller pie still kept us going for 2 days, so it would have been way too much to have the whole thing at once.   When I made the filling I was being bugged by little people & was a bit distracted, I forgot to add the sugar so added it after it was cooked, didnt seem to cause a problem though the filling was very sweet, dont know if that would have changed if the sugar had cooked down a bit?  Overall a delicious Winter pie that was definitely enjoyed by all!

Notes - The pastry was a little hard to work with though it tasted nice & short when cooked.  I did only need to bake mine for about 45 minutes & by then it was already a little too brown.  Strange as my oven usually cooks slower than a recipe so something to keep in mind.

Apple and Rhubarb Pie - Bills Sydney Food - Bill Granger

1kg Granny Smiths, peeled, cored and finely sliced
juice and zest of 1 lemon
50g butter, cut into small pieces
300g rhubarb, chopped
300g catser sugar
2 tablespoons plain flour
1 tspn ground cinnamon
1 qty shortcrust pastry (recipe below)
2 egg yolks, lightly beaten
2 tablespoons caster sugar for sprinkling

Toss the apples with the lemon juice and zest.  Melt the butter in a large frying pan over medium heat.  Add the apples and cook for 5   minutes, or until softened slightly.  Add the rhubarb and the sugar and cook for 1 minute further.  Add the flour and cinnamon, stir gently to combine.  Allow to cool.

Place half the pastry on a lightly floured surface and roll out until 4mm thick.  Lightly press into a 23cm pie tin and refrigerate while the filling is cooling.  Spread the apples & rhubarb evenly in the pie shell.

preheat the oven to 200c.  Moisten edges of pastry base with egg yolk.  Roll out remaining pastry on a lightly floured surface until 4mm thick.  Cover pie with rolled pastry.  Trim, press edges of the pie firmly together and crimp the outer rim with your fingertips.  make incisions in the top of the pie with a sharp knife.  Brush with remaining egg yolk and sprinkle with caster sugar.  Bake the pie for 1 hour until the crust is golden brown.  Remove from the oven and cool for 20 minutes.  Serve with ice cream of cream as desired!  Serves 6-8.

Shortcrust pastry
4 cups plain flour
1/2 cup icing sugar
a pinch of salt
360g unsalted butter, cubed
1/2 cup cream

Place flour, sifted sugar and salt in a bowl.  Add butter and rub through the fingertips until the mixture resembles coarse breadcrumbs.  Add just enough cream for mixture to form a ball.  Divide pastry into two balls, wrap in plastic wrap & refrigerate for 30 minutes before using.

Sunday, August 15, 2010

The famous Gingerlee Grench toast made by me!


I love the Syrian French toast at Gingerlee in Lygon st, East Brunswick & it's possibly my favourite breakfast out, if I ever go there I find it impossible to order anything else & many others feel the same, so when Delicious recently published a recipe inspired by this dish I was very, very excited that I could finally reproduce this dish at home.  It's a bit fiddly in that there are a few different components to prepare so I needed to invite someone over for brunch to make it worth the effort, luckily Karen was the target & she has tried the dish so felt she could fully appreciate it.  Loved it & seriously think it was just as good as the original which is great news, go ahead & try it & you will have a very speical home cooked brekky.

Wednesday, August 11, 2010

Bill Granger = Quick Week Night Winners


TV Chefs, seems like every chef out there with a cookbook has their head on tv these days so it wasnt hard to find someone from my cookbook collection for this weeks cook book challenge theme.  Bill Granger, now I have never actually watched him on tv as he only appears on foxtel (as far as I know) and is not accessible to us poor folk who only get free to air tv!  However despite not watching him wow me on the screen I am a huge fan of his recipes for various reasons, he always has great breakfast sections in his books, his cakes & desserts are amazing & his lunch & dinner fare is perfect for simple mid week dining & generally doesnt include 10 pounds of butter or cream as do some other cookbook recipes.  I was originally trying to find some fancy pants recipe for the theme but really had a busy week so this was all I could fit in.  As you can see from the photo the chicken is a deep, rich golden & sticky brown & actually looks quite similar to the photo in the book.  Juicy and tender thanks to the cooking in liquid, the lovely caramel flavour of the chicken is pretty intense (I would probably add less fish sauce next time & keep it a bit sweeter), though it does all balance out welll with the steamed rice & greens on the side,

Caramel Chicken - Bill Granger - Bills Open Kitchen

8 chicken thigh fillets, skinless, chopped in half
1 tablespoon vegetable oil
1 red onion, sliced
3 garlic cloves, sliced
freshly ground black pepper
60ml (1/4 cup) dark soy sauce
115g (1/2 cup) brown sugar
60ml (1/4 cup) fish sauce

Steamed rice & green vegetables such as broccoli & spinach to serve

Place the chicken and oil in a bowl and toss to combine.  Heat a large frying pan over a high heat until hot.  Add the chicken, in two batches, and cook for 2 minutes on one side until lightly brown, turn and cook for another minute.  Remove from the pan.  Reduce the heat to medium and add a little extra oil if needed. Add the onion and garlic and cook for 5 minutes, stirring occasionally.  Return the chicken to the pan, sprinkle liberally with black pepper, add the soy sauce & stir to combine.  Cover the pan, reduce the heat to low and cook for 10 minutes, stirring occasionally. Increase the heat to high, add the sugar and stir to combine.  Cook uncovered for 3 to 4 minutes, or until the sauce is rich, dark & syrupy.  Add the fish sauce and stir to combine.  Place ina serving dish and serve with rice & greens.  Serves 4

Tuesday, August 10, 2010

Sugar & Spice and all things nice

Week 38 of the cookbook challenge was spice week.  Even though I love spice in all forms I had a difficult time deciding what to make.  I didn't want a curry as I'd done my Sri Lankan dish just recently & didn't want a cake as have been over doing it a bit lately.  When I found this recipe for duck it sounded perfect, love duck & the spice mix was a bit different to anything I usually cook with.  The mix actually gave the duck a really lovely sweet flavour that went perfectly with the parsnip puree.  My mum had dropped off some home grown beets which I made a nice salad with & did some roast spuds to keep the kiddies happy, fantastic meal & really quite special for a weeknight.

Sugar and spice crusted duck with parsnip puree - Jill Dupleix - Good Living Winter

4 duck breasts
1 tsp black peppercorns
1 tsp juniper berries
1 tspn cumin seeds
1 tsp caraway seeds
Sea Salt and Pepper
600g parsnips, peeled and chopped
Brown sugar
1 tbspn butter
grated nutmeg
50ml milk

Preheat oven to 200c.  Score the skin of the duck in a diamond pattern.  Crush the peppercorns, juniper berries, cumin and caraway seeds and 1 tspn salt and place on a plate.  Gently press the skin into the spices.

Heat a dry, non-stick frying pan and cook the duck skin side down for 5-6 minutes over a gently heat until crisp.  Turn once & cook for 3 minutes.  Pour off the fat as it renders to prevent it burning.

Cook the parsnip in simmering salted water for 15 minutes until tender.

Transfer the duck to the oven, skin side up, scatter with brown sugar and bake for 10 minutes, then rest.  Drain the parsnip and puree with butter, nutmeg, salt and pepper to taste and sufficient milk to make it smooth.

Carve the duck thickly and serve on the puree.


Sunday, August 01, 2010

A Well overdue dinner party

Last night I had my brother & his girlfriend over for a bit of a dinner party.  I realized I haven't had anyone over for a proper dinner (apart from parents and in laws every week after babysitting which doesn't count), since before our renovations which is at least 18 months.   There have been plenty of brunches, lunches, cake & coffees & even a couple of parties of mass catering but no good old dinner party.  I love a dinner party & am really a bit sad that no one (I know) seems to have them anymore or if they do they dont invite me!  Back in my late twenties before marriage and kids, a few of us would have them all the time but since most people have settled down with kids they seem to think it's too much effort.  Not me, I am now going to try & do a dinner a month or so as I love it & dont care if I dont get an invite back, people will just have to put up with me & my dinners.  It's a great excuse to cook dishes I wouldnt normally make for just us & the kids.

My entrée for dinner was a mushroom, spinach & goats cheese tart.  I love tarts & would eat them every day if the pastry & cheese, etc wasn't so bad for my cholesterol.  This pastry recipe actually cooked a bit quickly so ended up a bit on the very dark brown side (though not burnt) & so was a bit crumbly, a little disappointing but not a complete failure.  The filling was delicious & right now I am wishing I made a double batch for leftovers but looks like it's toast for lunch again!

The main course was pan fried veal with a balsamic, pine nut & currant sauce/jus, whatever you want to call it, with a pumpkin & rocket salad on the side.  This was a risky move as I had to pretty much cook it up fresh after the entrée and by that stage I'd already had a few glasses of wine, luckily I was still functioning ok and there were no disasters, in fact I loved this dish in all it's simplicity & will definitely make it again.

Dessert was pretty much ready to go.  I made a white chocolate, mint & dark choc chip ice cream the day before which I was a bit concerned about.  It was a sugar syrup rather than a custard based ice cream and the melted white chocolate didn't seem to blend very well with the syrup when mixing.  Then the mixture didn't set in the ice cream machine which might have had something to do with the creme de menthe & vodka in it.  I threw it all into the freezer & hoped for the best.  tasting it in the morning I thought it was delicious even if it was a bit grainy, almost granita like.  I bought some store bought ice cream as a back up in case I had any last minute reservations but turns out there was no need to worry.  The ice cream was served with some oozy chocolate fondants, after the last week of Master chef there was no question this was what I had to make.  A few hours in the fridge before cooking ensured that they didn't set right through & just imagine how well they went with the minty, chocolatey ice cream, heaven!

I was very happy with everything & cant wait to invite my next lot of guinea pigs over for some more feasting.

Sunday, July 25, 2010

A hearty curry from Sri Lanka


The theme of hearty could have been right for just about every dish I am cooking these days, it's that cold weather & having to cook for 4 now and toddlers and pre-schoolers seem to like the hearty dishes best of all.

In the end I decided it's been ages since I cooked up a good curry (sadly need to stay away from chilli for the kids), so with not too much on I was ready to do the double dinner cook off, ie cook a spicy curry for Michael & I & a separate dinner for the kids (corn and zucchini fritters with chicken schnitzel if you are interested!).  I love Sri Lankan curries and really miss the old Village Curry House on Sydney road, what ever happened to it I wonder?  So I turned to my Food Safari book & the Sri Lankan chapter to find this classic chicken curry by Charmaine Solomon.  Despite the long list of ingredients, if you get all the spices measured up before you start and pretend you are a tv chef filming :), its a really simple curry to put together.  The flavours are delicious, spicy yet subtle & all rounded off nicely by the addition of the coconut milk at the end, one to make again & very close to the flavours of my old favourite.

The rest of the weeks hearty dishes include a chicken and leek pie, spaghetti and meatballs and beetroot soup, mmm 2 months in and still not sick of Winter cooking for 2010.


Notes - I used dried curry leaves as didn't have time to search out fresh ones.  Also didn't bother peeling my tomatoes as for a dish like this I dont notice the difference.  And sadly no pandan leaves to be found either so left out with no substitute.  And my biggest note, even though I asked for chicken on the bone, I unwrapped my parcel to find boneless thigh pieces, thankfully this didn't dry the dish out & it was still perfect.

Chicken Curry - Food Safari - Maeve O'Meara - Recipe by Charmaine Solomon in Sri Lanka Chapter

2 tablespoons ghee or vegetable oil (or a combination)
1/4 tspn fenugreek seeds
10 curry leaves on the stem
2 large onions, finely chopped
4-5 garlic cloves, finely chopped
2 teaspoons grated ginger
1 teaspoon tumeric
1 teaspoon chilli powder
1 tablespoon ground coriander
1/2 teaspoon ground fennel
1 teaspoon ground cumin
2 teaspoons sweet paprika
2 teaspoons salt
2 tablespoons vinegar
2 tomatoes, peeled and chopped
6 cardamon pods, cracked
1 cinnamon stick
1 lemongrass stalk, bruised
1 pandan leaf, folded
1.5kg chicken thighs on the bone
250ml thick coconut milk
lemon juice (optional)

Heat the ghee or oil and fry the fenugreek seeds and curry leaves until the leaves start to turn brown.  Add the onion, garlic and ginger and fry gently until the onion is soft and translucent.  Add the ground spices, salt and vinegar and stir well.  Add the tomato, whole spices, lemongrass and pandan leaf, then add the chicken.  Stir to coat the chicken in the spices, then cover and cook over a low heat for 40-50 minutes.  Stir in the coconut milk and taste for salt.  Add a squeeze of lemon juice if desired.  Serves 6.

Tuesday, July 20, 2010

Some Winter comforts, roast & pud

Friday night was freezing and I hadn't baked since the weekend so I had an irresistible urge to make a pudding.  As this weeks theme for the Cookbook challenge was comfort food I thought it was also necessary for the good of the challenge, so my excuses to myself made I whipped up a batch of very quick golden syrup puddings that then took an hour to bake.  Note that I did a session on my exercise bike while they were in the oven to prepare for my sins!   This recipe was from The Good Living Winter cookbook & features on the cover.  Note that the cover also looks much better than mine, they seemed to end up with a lot more sauce & a much richer syrupy color, think I added too much butter/not enough golden syrup.  Other than that, really tasty pudd without being too heavy.  Love the flavour of golden syrup so really it was bound to be good.

Note - I used baking paper topped with foil rather than buttering foil - it all seemed to messy for me.  I also didnt tie mine up & only one spilled out a little while cooking.

Little golden syrup puddings - Good Living Winter - recipe by Jill Dupleix

150g butter
150g soft brown sugar
2 large eggs
1/2 tspn vanilla extract
2 tbspn golden syrup
150g self raising flour, sifted
2 tbspn milk

Sauce
2 tbspn golden syrup
2 tbspn butter

Preheat oven to 180c.  Lightly butter 4 ovenproof 150ml ramekins or pots.

Beat the butter, sugar, eggs, vanilla extract and golden syrup with an electric mixer for 4 minutes.  Fold in small amounts alternately of the flour and the milk until you have a fairly stiff batter.

Tip the mixture into the pots, cover each with a piece of buttered foil and tie foil with string.  place in a baking tray and pour in boiling water halfway up the sides of the ramekins.  Bake for 1 hour or until the puddins spring back to the touch.

Sauce:  Gently heat the golden syrup and butter in a small pan.  Turn out the puddings and spoon the sauce over the top.  Serve with ice cream if desired.

And for my savoury comfort food of the week, I felt a nice roast pork was in order.  For something different I went for Bill Granger's roast pork with braised veggies on the side rather than roasted.  The idea being to cut down on the fat content a bit.  The pork had lovely flavours though I dried mine out a bit, cooked it a bit too long and took the baking paper off to try & get my crackle crisp (Bill's didnt have crackling).  I compensated by making some gravy to pour over the top.  The veggies were nice but I have to say it just wasn't quite the same without nice crunchy roast spuds, soft, caramelized pumpkin, etc so now I am still craving a roast, the proper way!

Slow-Roasted Pork Shoulder with Cumin and Coriander Seeds - Bill Granger - Holiday

Serves 6

1 tspn cumin seeds
1 tspn coriander seeds
2kg Pork Shoulder on the bone
olive oil
sea salt
freshly ground black pepper

Preheat the oven to 240c.  Crush the cumin and coriander seeds with a mortar and pestle.  Put the pork in a large roasting tin, drizzle with olive oil and rub with the crushed spices.  Season well with salt and pepper.  Put in the oven and roast for 30 minutes or until the pork is browned, then remove from the oven.

Reduce the oven to 180c.  Moisten a large piece of baking paper with water and place over the pork, tucking the edges underneath.  Return to the oven and roast for 2 hours or until tender.  Rest for 10 minutes before carving. 


Braised Potatoes and Peppers with Bay

Serves 6

3 tblspns olive oil
2 red onions, sliced
750g yellow waxy potatoes, peeled, cut into wedges
1 large red capsicum, cut into thin strips
1 large green capsicum, cut into thin strips
3 garlic cloves
3 bay leaves
250ml (1 cup) chicken stock
sea salt
freshly ground black pepper

Heat the olive oil in a large non-stick deep frying pan over medium low heat.  Add the onions and cook, stirring occasionally, for 10 minutes.  Add the potatoes, capsicums, garlic and bay leaves and cook, stirring occasionally for another 10 minutes.  Add the stock and bring to the boil.  Reduce the heat to low, cover and simmer for 20 minutes.  remove the lid, increase the heat to medium and continue to simmer, stirring occasionally, for 10-20 minutes until all the stock has evaporated and the potatoes are tender, coloured and starting to form a crust.  Season well with sea salt and freshly ground black pepper.

Tuesday, July 13, 2010

Spanish Feasting

The theme for this weeks Cookbook challenge was Spanish & who doesn't love a good old Spanish feast?

The first dish I cooked was for my family, I had some egg yolks that needed using up & Bill Granger's Crema Catalana was calling my name.  I have never made one before but I guess its fairly similar to a brulee which I have had some success with & besides it meant I got to pull out & dust off my barely used blow torch - yay fun with fire!  The recipe was pretty good in that the end flavour was sensational, lovely spiced cream without being too sickly & the crackly top was a wonderful contrast even though I may have overdone the torching.  The only problem I had was that mine didn't seem to set in the oven even though I cooked them for a lot longer than the specified time.  A few hours in the fridge & they were pretty well set but I cant help feeling they were still a little on the soft side, not too worry as id didn't seem to effect the pleasure factor.  Oh and did I mention that I had this for breakfast as I knew there was no way I would have room after our potluck lunch (details to follow), very decadent breakfast!

Crema Catalana - Bill Granger - Simply Bill

625ml (2 1/2 cups) cream
170ml (2/3 cup) milk
2 teaspoons natural vanilla extract
2 cinnamon sticks
peel from 1 orange
peel from 1 lemon
6 egg yolks
4 tablespoons caster sugar
2 1/2 tablespoons soft brown sugar

Preheat oven to 140c.  Put the cream, milk, vanilla extract, cinnamon, orange and lemon peel in a saucepan over medium heat and bring just to boiling point, then remove from the heat. 

Whisk together the egg yolks and caster sugar in a large bowl.  Strain the cream and pour slowly over the yolks and sugar mixture, whisking constantly.  Skim off any foam that rises to the top.

Put six 125ml ramekins in a large roasting tin and spoon the mixture into them.  Pour hot water into the tin to come halfway up the sides of the ramekins & cover with foil.  Bake for 30-35 minutes, or until just set.  Lift the ramekins out of the tin and leave to cool before chilling in the fridge for 2 hours.

Preheat the grill to its hottest temperature.  Put the ramekins on a baking tray, sprinkle brown sugar over the chilled creams and then place under the grill for a couple of minutes until the sugar is melted & dark golden (alternately if you have a chef's blowtorch this is the time to use it).  Leave for a few minutes for the sugar to cool & harden before serving.  Serves 6.

Next I had to cook a dish for the Cookbook Challengers potluck Spanish themed lunch, kindly hosted by Agnes at Off the Spork.  I thought there may be a lot of reheating going on so I brought along a dish I could serve straight up.  This 'Asadilo de Pimientos', basically a Roasted capsicum, tomato, garlic and onion salad is a recipe by Frank Camorra in the Food Safari cookbook.  Personally I loved the salad and thought it was nice and refreshing alongside some of the heavier dishes of the day, hope everyone else enjoyed it too.  I've also been eating it for lunch since then on some nicely toasted sourdough rye, it's like a bit like an Italian bruschetta that way. 

Note this recipe has 2 whole heads of garlic in it so beware!  Also to note, I didnt bother peeling or seeding my tomatoes as I really cant see the big deal about going to all the extra effort.  For the dressing, I used half quantities & the dish was still swimming on dressing so dont feel the need to add the whole cup of olive oil or half a cup of sherry vinegar, in my opinion it would be way too much.

Asadillo de Pimientos (Frank Camorra) - Maeve O'Meara - Food Safari

6 red capsicums
2 onions
2 heads garlic
250ml extra virgin olive oil (arbequina if possible)
sea salt
500g tomatoes, peeled, seeded and roughly chopped
1/2 bunch flat leaf parsley, roughly chopped
125ml sherry vinegar
1 tablespoon cumin seeds, toasted and crushed

Preheat oven to 180c.  Place the whole capsicums, onions and garlic in a baking dish.  Drizzle with some of the olive oil and sprinkle with sea salt.  Roast for 30 minutes or until the onion is soft.  Transfer to a bowl, cover with plastic wrap (the steam will help loosen the skins) and set aside until cool enough to handle.

Put the tomato and parsley in a separate bowl.  Squeeze the onions from their skins, roughly chop them and add to tomatoes.  Cut the tops of the heads of garlic & squeeze the cloves into the bowl.  Peel the capsicums and discard the seeds.  Tear the flesh into strips and add to the bowl.  Pour over the remaining oil and the sherry vinegar.  Sprinkle with the cumin and add salt to taste.  Toss well with your hands.

And to end of Spanish week with a bang I give you the Cookbook Challengers Potluck lunch.  As I said before the lovely Agnes at Off the Spork hosted with other 'cooking' guests being Penny at Jeroxie (Addictive and ConsumingApril at My Food Trail, Cherrie at Sweet Cherrie Pie, and Leigh of Chit, Chat, Chomp, plus some partners and stomachs for good measure (you know who you are!).

The aim was to bring along your Spanish dish for everyone to share.  The picture above does no justice to the amount of food we consumed in the end, with some people cooking up to 4 dishes (I think that was the max). From memory this is what we had, Oxtail (beef) stew, wrinkly potatoes, deep fried custard & lemon tart all from Agnes,  octopus stew, sardines, mushrooms & toast from Penny, garlic prawns, breads & friands from April, beef roll ups from Cherrie, Chorizo, pea & filo parcels plus Spanish bickies from Leigh & the salad from myself.  A fantastic feast from all thanks very much.  For individual details and closer ups of all the other dishes, sure they will all be posted on the girls blogs soon.  Nice to meet some fellow lovers of food & share the love on a sunny Melbourne afternoon

Wednesday, July 07, 2010

Winter Favourite = Soup in any form

As I have said many a time before, I absolutely adore soup in pretty much any form and flavour so I was very happy with this weeks Cookbook challenge theme.  I decided on a classic Tuscan Ribollita from Skye Gyngell's My favourite ingredients.  I am really loving this book, there are not that many recipes, yet every one I have tried so far has turned out to be something special (apart from my panna cotta which didn't work!).

In Skye's version of this soup she replaces the stale bread with farro.  I couldnt find farro anywhere in Brunswick so in my version I replaced the farro with Greenwheat Freekeh.  I love trying new grains & this was a first for me.  From the back of the box 'Greenwheat Freekeh is 100% Australian grown wheat.  Picked and roasted when the grain is green, it retains a higher percentage of protein, dietary fibre, vitamins and minerals, in particular, calcium, potassium, iron and zinc than mature wheat.

I threw the freekah into the soup with the water & let it bubble away so it was very easy to prepare.  The soup was delicious & hearty & the freekah added a lovely texture, almost nutty in it's chewiness though definitely not tough, lovely all around.

Notes - I used canned beans instead of dried & just added them about half an hour before the end of cooking time.  I also substituted rainbow chard for cavolo nero as I have some growing out the back.  And as mentioned I used freekah instead of farro as I couldn't get my hands on any.

Ribollita - Skye Gyngell's My favourite Ingredients

Serves 6-8

400g dried cannellini beans, soaked in cold water overnight
About 3 litres water
5 tablespoons olive oil
2 onions, peeled and chopped
1 dried red chilli, crumbled
sea salt and freshly ground black pepper
2 celery sticks, chopped
2 carrots, peeled and chopped
3 small garlic cloves, peeled and smashed
small bunch of sage
2 potatoes, peeled and chopped
150g farro, well rinsed under cold water
400g can peeled plum tomatoes
bunch of cavolo nero, thick stalks removed, roughly chopped
extra virgin olive oil, preferably Tuscan, to serve

Drain the beans and place them in a heavy based saucepan.  Pour on about 2 litres water to cover generously and cook over a low heat until the beans are soft, about 1 1/2 hours.  Drain and set aside.

Heat 3 tbsp of the olive oil in a seperate cooking pot (large enough to hold all the ingredients comfortably) over a low heat.  Add the onions, chilli and a pinch of salt.  Sweat gently until the onions are soft and translucent.

Now add the celery, carrots, garlic, sage, potatoes and farro.  Cook for a couple of minutes to allow the heat to begin to release the flavours of the vegetables, then add the tomatoes.  Cover and simmer over a low heat for 20 minutes.

Stir in the cooked beans, then cover with about 1 litre of water - just enough for a thick brothy base in which the vegetables can cook properly.  Add the cavolo nero and reduce the heat to low.  Cover and cook for a further hour until the vegetables are really soft.  Add a generous pinch of salt and a few good grindings of pepper.

Remove from heat and allow to cool completely.  Let the soup stand for a couple of hours - this will improve the flavour no end. 

When ready to serve, reheat the soup, taste and adjust the seasoning if necessary, then drizzle with extra virgin olive oil.  Turn up the heat to emulsify, then ladle into warm bowls.

Tuesday, June 29, 2010

Prawns & camera questions

Before I talk about this weeks challenge, I have a question for all of you food bloggers out there.  I am ready for a new camera (see photo above for why!), I really want to up the quality of my photos and the current camera just does not do the job.  I realize I need to spend more time on food styling too but lets face it with screaming kids at my heels half the time I'm lucky I get any photos at all.  So the first question is should I go digital slr or stick with a plain old compact digital.  As well as taking photos of food (yes I do have a life outside of cooking!), I love taking photos of people, my garden & holiday snaps too.  I believe an SLR gives a better photo though it's been 20 years since I have picked one up so dont know how much time I could devote to learning how to use one all over again, might just use the auto setting forever.  Also after a couple of questions it seems that SLR's do not have a macro function & I would need to buy another lens, starting at $500.00 thats more than I want to put out on top of the cost of a new camera.  What does everyone out there use, would love some advice on this one before I take the plunge & buy my next camera, thanks?

Back onto food, this weeks challenge was seafood, I had a hankering for prawns and wanted to find a nice comforting wintery way to cook them, George Calombaris' recipe in Greek Cookery from the Hellenic Heart seemed to be just what I was after.  The sauce the prawns were cooked in was delicious though I didnt get my pan close enough to the grill for the feta to brown up, I dont think this made much of an difference apart from in appearance.  Loved the sauce & the prawns were nice too yet I didnt really love the dish & didnt think the prawns went that well with the sauce even though the 2 elements on their own were great.  All in all an okay meal but one I wouldnt bother making again, a bit of a disappointment really considering all of the options I could have gone with for such a wonderful theme.

Prawn Saganaki (Baked prawns, tomato and feta) - George Calombaris - Greek Cookery from the Hellenic Heart.

600g whole green prawns
4 brown onions sliced
250g extra virgin olive oil
3 cloves garlic, sliced
1 tablespoon thyme, chopped
2 cups crushed tomatoes
1 cup water
1/2 bunch shredded parsley
100g feta, crumbled

In a heavy based saucepan, saute prawns in olive oil for 3 minutes.  Add onions and continue to cook for further 3 minutes.  Add the garlic and thyme, cook for 2 minutes, then add crushed tomatoes and 1 cup water and simmer for 5 minutes.  Season to taste.  Stir in shredded parsley, spoon into serving dish and sprinkle with feta.  Grill until golden and drizzle with extra virgin olive oil to serve.

Saturday, June 26, 2010

Soup and Spanish Potato Week


Potatoes would have to be one of my favourite foods yet I was a little uninspired when it came to potato week in the challenge.  I guess mostly my love of potatoes is as a side, smooth and creamy mash, crispy roast potatoes, the humble chip done really well for example and not a star though they do star in some fabulous dishes all alone, one of favourites being the potato pancake/rosti/hash brown - whatever you choose to call it.  
I also found it funny that I chose a Spanish dish and a soup dish which after seafood week next week are the 2 themes for week 34 and 35, must be sub-consciously thinking ahead!  My soup dish wasn't actually meant to be for the challenge, I was just wanting a very quick meal to throw together for Friday night dinner & was looking through Nigella Express for inspiration where I found the recipe.  I wouldn't even call it a recipe, its more just a couple of ingredients thrown into a pot & cooked for a while then whizzed up.  That's what I love about soups really, the simplicity of some fresh ingredients cooked in the one pot, maybe a fresh slice of bread on the side & you have a fabulous warming winter meal.  This sweet potato and pumpkin soup was no exception, sweet and creamy with a lovely tang thanks to the sour cream I added at the end & everyone had a smile on their face.

Note the recipe calls for buttermilk which I substituted with sour cream as I love it in soups and I had some in the fridge just calling out to be stirred through.  Nigella also suggests buying pre-chopped veggies, I didn't go that far, really it's not that difficult to slice up some pumpkin and potato is it?

Butternut and sweet potato Soup - Nigella Lawson - Nigella Express

350g diced butternut pumpkin and sweet potato from a packet.  (I used one large sweet potato and half a pumpkin)
750ml hot chicken or vegetable stock ( I used 1 litre to make up for the extra veg I put in)
1/4 teaspoon ground cinnamon
1/4 teaspoon ground mace
Freshly ground black pepper
4 teaspoons buttermilk

Put the diced veggies and hot stock in a large saucepan with the stock and spices.  Bring to the boil and simmer for approx 15 minutes or until the veggies are tender.  Add some pepper to taste.

Puree the soup with a stick mixer or blender, stir through buttermilk (or sour cream) to serve.


For my second dish firstly I would like to apologize for the photo, it wasn't a pretty dish, which combined with the lack of good light & my poor food styling does not make it look very appetizing at all.  This was a quick spanish dinner from The Hungry Girls Cookbook Volume 2.  If you haven't heard of the book, it's a small collection (12) of recipes put together by 3 local girls, you can read all about it here.

Some typical Spanish ingredients such as , potatoes, capsicums, smoked paprika, chorizo all done in a bit of a fry up was perfect for me to knock up after work one night for the in laws, that's right, I am back working.  At this stage only 2 days a week from home so you wouldnt think it would be too much different to my old ways but those 2 days throw me about.  Josh is very clingy so when I finish at 5 he really bawls for me so even this quick meal is difficult, it breaks your heart when all they want is you & you cant go to them, he really is a mummy's boy which Chloe never was (girl that is!).  I think from now on on work nights I will try & cook the night before so all I have to do is reheat.  Anyway back to the dish, nothing spectacular but a nice comforting dinner all the same.  You really have to watch the salt & get your flavours balanced right, I found the potatoes needed lots of salt yet the chorizo didn't so it was hard to get it perfect.

Note that the recipe feeds 3-4 so I adjusted the quantities to feed more, extra spuds & chorizo

Quick Spanish dinner - The Hungry Girls Cookbook - Volume 2

4 medium potatoes (about 800g)
2 large red capsicums
1 medium onion
1 small semi-dried chorizo (about 125g)
2 garlic cloves
Big handful parsley leaves
2 1/2 tablespoons olive oil
1 heaped teaspoon smoked paprika
3/4 teaspoon salt

Bring a pot of water to the boil and cook the potatoes in their skins until just soft.

Meanwhile, get everything else ready, halve and seed the capsicums and cut the strips in half widthwise.  Finely slice the onion.  Cut the chorizo in half lengthwise then thinly slice it.  Finely chop the garlic and roughly chop the parsley.

When the potatoes are half cooked, heat a frying pan over high heat and add the oil and capsicums.  Cook for 5 minutes, stirring regularly, until the capsicum skins are starting to wrinkle.  Turn the heat back a little, add the inion and continue cooking for 8-10 minutes, until the onion and capsicum are collapsed and browning at the edges.  meanwhile, drain the potatoes and cut into bite sized chunks.

Add the chorizo, garlic and paprika to the pan and fry for another few minutes, until the chorizo has browned slightly.  Add the potatoes and salt and stir gently until the potatoes are covered in the rust coloured juices.  Stir in the parsley.  Taste & adjust the seasoning as required.